SPRUZZA Bottom-Fill Box Review
Many users who have spent a long time dripping probably share the same frustration: the vapor and flavor are great, but taking it out is simply too inconvenient. You need to carry an e-liquid bottle and constantly find time to drip. As always, the market
Many friends who have been using dripping devices for a long time share the same frustration: while the vapor and flavor are great, taking them out is too cumbersome, as you have to carry a bottle of e-liquid and always find time to drip. The market's wisdom in addressing this demand is boundless. As players struggled with this issue, bottom-fill boxes emerged, and I must say, the person who came up with the idea of bottom filling is a genius, as it really solves the problem well. Today, I want to share a device that embodies this concept—the SPRUZZA bottom-fill box.
Recognize the manufacturer by the logo; make sure it’s from ASMODUS. The outer packaging is square, and the contents, including the box and atomizer, are clearly visible.
Without further ado, let’s open the package. Inside, you’ll find the atomizer, bottom-fill box, a liquid chamber accessory pack, a common accessory pack, two 0.2-ohm pre-made heating wires, a manual, and some other related cards. I must commend ASMODUS for including heating wires with the atomizer, which really saves players a lot of trouble.
 Let’s start with the box. The covers on both sides are made of stabilized wood, while the middle section is the filling rod, which uses a pump-style filling mechanism. Pressing down once completes a bottom-up filling.
It has a universal 510 connector.
At the bottom of the box, there are three pressure relief holes, and you can also see the recessed areas on both sides, which facilitate the removal of the side covers.
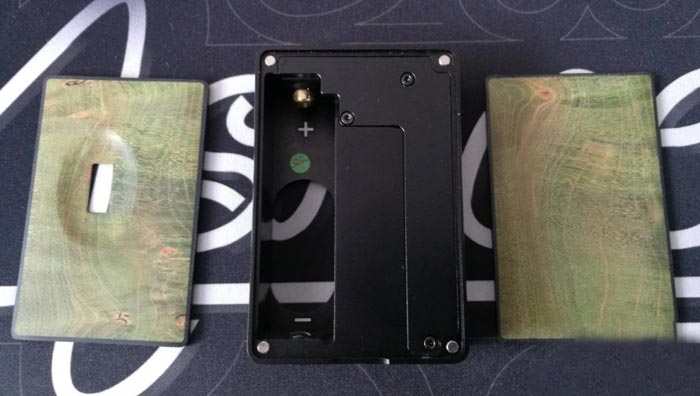
Removing the side covers is quite easy. The box itself is made of metal, with a frosted finish inside, and the craftsmanship is excellent. You can see the magnets on the corners of the box that hold the side covers.
On one side is the battery compartment. To accommodate the chip and circuit, a single 18650 battery design was adopted, balancing size with reasonable internal space allocation. The choice of a single battery for the bottom-fill box is also a necessary compromise.
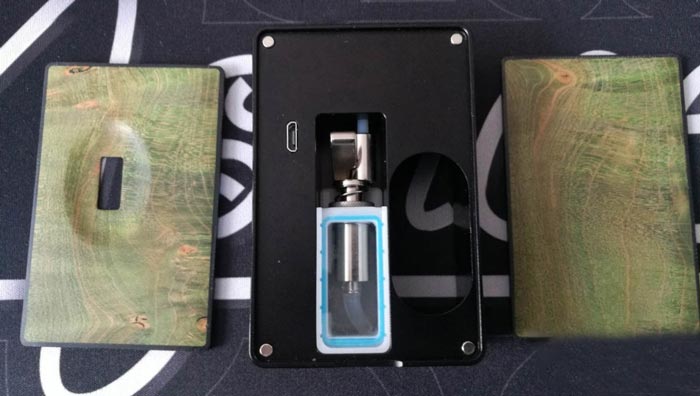
On the side of the box is the liquid chamber, where you can see the hidden charging port. The central part is the integrated liquid pump and chamber, which is crucial.
The liquid chamber can be easily pulled out for disassembly. When reinstalling, as long as the pump hole on top of the chamber connects properly with the liquid guide tube, there will be no leakage.
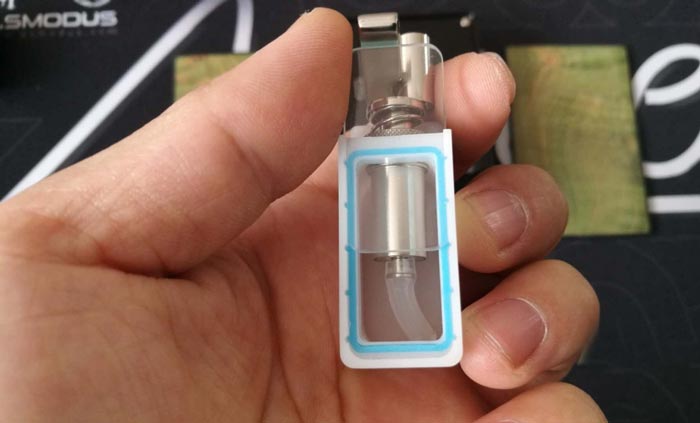
 The chamber cap is a push-up style; just push it up to fill the e-liquid directly.
During normal filling, the liquid pump does not need to be removed from the box. Just open the side cover, push up the chamber cap, and add e-liquid. To be honest, the capacity of the chamber isn’t very large; I didn’t measure it exactly, but it feels like it’s between 3-4 ml. Based on my usage habits, one chamber lasts about half a day, but it’s still much more convenient than dripping.
Now that we’ve covered the box, let’s look at another key point of the kit, the atomizer. As shown, it has a metal frosted finish and a rounded appearance, giving it a bit of a beetle-like feel, which I quite like.
The structure of the atomizer isn’t complicated; once opened, it’s clear. It features a chamfered drip tip, a metal top cap, and a four-electrode base with a screw design, which is a common bottom airflow design.
The base is excellently crafted, with all corners rounded. The protruding part in the middle of the liquid channel is the liquid outlet, which aligns horizontally with the cotton packing area.
Remember, this well-crafted atomizer is called ONI-ONE.
 Now, let’s start using it. There are many methods for making coils with the four-electrode design, but using the pre-made wires from the accessory pack is practical and simple, and the 0.2-ohm resistance is sufficient for general users.
Using the hex screwdriver from the accessory pack, I quickly finished the build.
Beautiful colors.
After finishing the coil, as usual, we fill the cotton. The cotton should be packed tightly until it fills the liquid channel, ensuring that it naturally presses against the liquid outlet. However, be careful not to block the airflow above the liquid outlet, leaving some space in the middle, as shown in the picture, is just right.
The box maintains ASMODUS's consistent power, with responsive ignition and no delay. The maximum power of 80W can meet various daily usage needs. #p#分页标题#e#
Next, let’s talk about the software part of the box. The SPRUZZA bottom-fill box still uses a one-button + touch screen operation method. After some research, I found that the chip and usage method are identical to the Colossal 80w I previously introduced. Haha. Please allow me to take a shortcut and directly use the Colossal 80w's user guide.
Press the fire button five times to turn it on; the interface appears as shown. On this interface, swipe down on the touch screen to unlock settings, and the fire button returns to the previous menu.
After unlocking, as shown, the top POWER indicates the firing mode, the middle 40W indicates the power, press and hold to enter power adjustment, below V is the voltage, Ω is the resistance, S is the firing time, P is the number of firings, and the N letter at the bottom allows you to swipe up and down to select three output modes: S (soft), N (normal), H (hard).
Swipe left and right on the POWER section to enter other modes. TEMP temperature control mode, tap the middle W to switch to display ℉ temperature, press and hold to enter temperature adjustment.
CURVE output mode.
The CURVE mode setting interface allows you to tap the middle power W to switch to S time, press and hold to adjust the power and time curve points. After exiting, it automatically saves the data, and the data is remembered, with the data number displayed in the lower area as P. You can swipe up and down on this interface to use other stored data, with a total of 5 groups available, displayed as P1~P5 in the lower area.
TCR multi-wire temperature control compensation mode.
Tap the middle power number to display W and ℉, press and hold to enter power or temperature adjustment, swipe up and down to select the number position to change, and after exiting, save the memory data. You can swipe up and down to use other stored data, with a total of 5 groups available, displayed as M1~M5.
TFR temperature control mode, with the same setting method as TCR mode.
Press the fire button three times to lock the device, and press three times again to unlock. Press the fire button five times to enter the shutdown interface; on this interface, press and hold the screen to shut down, but if you swipe left and right on this interface, you can also access system settings.
The six system options are: screen unlock mode (swipe down or tap the touch screen three times), system information, firmware upgrade, screen brightness, clear firing count, and firing count limit.
 With such functionality in a bottom-fill box, are you afraid? Haha
A little tip: when using the bottom-fill, after a while, if you’re unsure how much e-liquid is left in the cotton and want to empty it before refilling, but are worried about burning the cotton, just remove the drip tip and check the cotton.
The amount of e-liquid dispensed with one pump is about 0.5ml, so you need to gauge how much to fill based on the cotton's oil capacity during use. Personally, I find that when the cotton is almost dry, 6-8 pumps are sufficient; overfilling can lead to leaks.
Overall, the SPRUZZA bottom-fill box offers an excellent user experience, with thoughtful design, meticulous craftsmanship, and powerful functionality. The atomizer also delivers a high-quality flavor. The bottom-fill design allows you to conveniently carry a dripping device for use anytime. The single battery and small liquid chamber design is somewhat regrettable, but considering the compensation in functionality and safety, it is entirely acceptable, and the benefits far outweigh the losses.
Recognize the manufacturer by the logo; make sure it’s from ASMODUS. The outer packaging is square, and the contents, including the box and atomizer, are clearly visible.
Without further ado, let’s open the package. Inside, you’ll find the atomizer, bottom-fill box, a liquid chamber accessory pack, a common accessory pack, two 0.2-ohm pre-made heating wires, a manual, and some other related cards. I must commend ASMODUS for including heating wires with the atomizer, which really saves players a lot of trouble.
Let’s start with the box. The covers on both sides are made of stabilized wood, while the middle section is the filling rod, which uses a pump-style filling mechanism. Pressing down once completes a bottom-up filling.It has a universal 510 connector.
At the bottom of the box, there are three pressure relief holes, and you can also see the recessed areas on both sides, which facilitate the removal of the side covers.
Removing the side covers is quite easy. The box itself is made of metal, with a frosted finish inside, and the craftsmanship is excellent. You can see the magnets on the corners of the box that hold the side covers.
On one side is the battery compartment. To accommodate the chip and circuit, a single 18650 battery design was adopted, balancing size with reasonable internal space allocation. The choice of a single battery for the bottom-fill box is also a necessary compromise.
On the side of the box is the liquid chamber, where you can see the hidden charging port. The central part is the integrated liquid pump and chamber, which is crucial.
The liquid chamber can be easily pulled out for disassembly. When reinstalling, as long as the pump hole on top of the chamber connects properly with the liquid guide tube, there will be no leakage.
The chamber cap is a push-up style; just push it up to fill the e-liquid directly.During normal filling, the liquid pump does not need to be removed from the box. Just open the side cover, push up the chamber cap, and add e-liquid. To be honest, the capacity of the chamber isn’t very large; I didn’t measure it exactly, but it feels like it’s between 3-4 ml. Based on my usage habits, one chamber lasts about half a day, but it’s still much more convenient than dripping.
Now that we’ve covered the box, let’s look at another key point of the kit, the atomizer. As shown, it has a metal frosted finish and a rounded appearance, giving it a bit of a beetle-like feel, which I quite like.
The structure of the atomizer isn’t complicated; once opened, it’s clear. It features a chamfered drip tip, a metal top cap, and a four-electrode base with a screw design, which is a common bottom airflow design.
The base is excellently crafted, with all corners rounded. The protruding part in the middle of the liquid channel is the liquid outlet, which aligns horizontally with the cotton packing area.
Remember, this well-crafted atomizer is called ONI-ONE.
Now, let’s start using it. There are many methods for making coils with the four-electrode design, but using the pre-made wires from the accessory pack is practical and simple, and the 0.2-ohm resistance is sufficient for general users.Using the hex screwdriver from the accessory pack, I quickly finished the build.
Beautiful colors.
After finishing the coil, as usual, we fill the cotton. The cotton should be packed tightly until it fills the liquid channel, ensuring that it naturally presses against the liquid outlet. However, be careful not to block the airflow above the liquid outlet, leaving some space in the middle, as shown in the picture, is just right.
The box maintains ASMODUS's consistent power, with responsive ignition and no delay. The maximum power of 80W can meet various daily usage needs. #p#分页标题#e#
Next, let’s talk about the software part of the box. The SPRUZZA bottom-fill box still uses a one-button + touch screen operation method. After some research, I found that the chip and usage method are identical to the Colossal 80w I previously introduced. Haha. Please allow me to take a shortcut and directly use the Colossal 80w's user guide.
Press the fire button five times to turn it on; the interface appears as shown. On this interface, swipe down on the touch screen to unlock settings, and the fire button returns to the previous menu.
After unlocking, as shown, the top POWER indicates the firing mode, the middle 40W indicates the power, press and hold to enter power adjustment, below V is the voltage, Ω is the resistance, S is the firing time, P is the number of firings, and the N letter at the bottom allows you to swipe up and down to select three output modes: S (soft), N (normal), H (hard).
Swipe left and right on the POWER section to enter other modes. TEMP temperature control mode, tap the middle W to switch to display ℉ temperature, press and hold to enter temperature adjustment.
CURVE output mode.
The CURVE mode setting interface allows you to tap the middle power W to switch to S time, press and hold to adjust the power and time curve points. After exiting, it automatically saves the data, and the data is remembered, with the data number displayed in the lower area as P. You can swipe up and down on this interface to use other stored data, with a total of 5 groups available, displayed as P1~P5 in the lower area.
TCR multi-wire temperature control compensation mode.
Tap the middle power number to display W and ℉, press and hold to enter power or temperature adjustment, swipe up and down to select the number position to change, and after exiting, save the memory data. You can swipe up and down to use other stored data, with a total of 5 groups available, displayed as M1~M5.
TFR temperature control mode, with the same setting method as TCR mode.
Press the fire button three times to lock the device, and press three times again to unlock. Press the fire button five times to enter the shutdown interface; on this interface, press and hold the screen to shut down, but if you swipe left and right on this interface, you can also access system settings.
The six system options are: screen unlock mode (swipe down or tap the touch screen three times), system information, firmware upgrade, screen brightness, clear firing count, and firing count limit.
With such functionality in a bottom-fill box, are you afraid? HahaA little tip: when using the bottom-fill, after a while, if you’re unsure how much e-liquid is left in the cotton and want to empty it before refilling, but are worried about burning the cotton, just remove the drip tip and check the cotton.
The amount of e-liquid dispensed with one pump is about 0.5ml, so you need to gauge how much to fill based on the cotton's oil capacity during use. Personally, I find that when the cotton is almost dry, 6-8 pumps are sufficient; overfilling can lead to leaks.
Overall, the SPRUZZA bottom-fill box offers an excellent user experience, with thoughtful design, meticulous craftsmanship, and powerful functionality. The atomizer also delivers a high-quality flavor. The bottom-fill design allows you to conveniently carry a dripping device for use anytime. The single battery and small liquid chamber design is somewhat regrettable, but considering the compensation in functionality and safety, it is entirely acceptable, and the benefits far outweigh the losses.