DIY E-Cigarette Tutorial
This DIY e-cigarette tutorial is for users who want to build their own setups. Frequent vapers know how to make their own atomizer coils. A DIY coil can better match personal preferences and usage habits, and compared with prebuilt coils, it is often more
DIY E-Cigarette Tutorial
This DIY tutorial is for players who want to create their own e-cigarette. Friends who often use e-cigarettes know how to DIY an atomizing core. DIY atomizing cores not only cater to personal preferences and better meet usage habits, but they are also more cost-effective compared to pre-made cores. Therefore, making your own atomizing core is a must for all e-cigarette enthusiasts. Today, I am not here to argue; I just want to share knowledge and spread love, discussing how to DIY an entire e-cigarette together.
First, prepare two chip cans:
Then, remove the front lids from the chip cans and apply hot glue to one of the lids.
Next, stick the other lid onto it, and when done, it should look like this:
 The glue will dry in a while, and then you can connect the front and back of the chip can.
Next, let's make the atomizing platform. Find a suitably sized wooden block, drill holes on both sides with an electric drill, and use hot glue to attach it to the two chip lids.
After connecting the wooden block, drill through the lid to prepare for connecting the electrode posts.
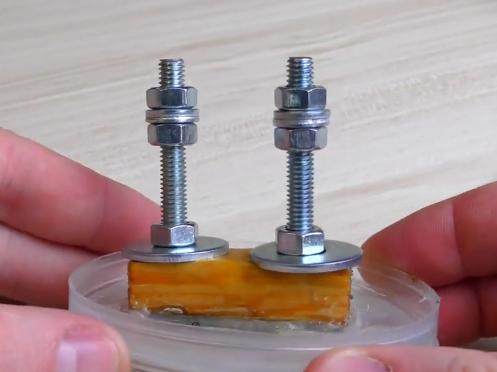
For the electrode posts, you can use large screws and washers available at hardware stores, ensuring to choose materials with good conductivity.
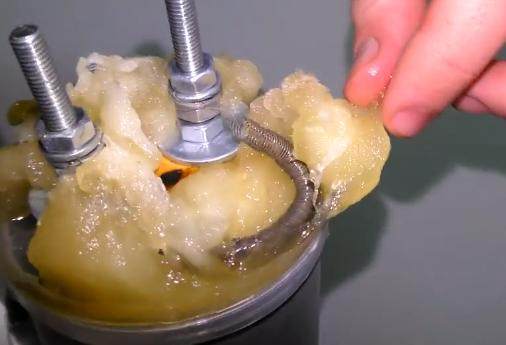
Connect the wires between the washers and tighten the screws on both sides.
The finished product should look like this:
 Now our atomizing platform is ready, and next, we need to make the voltage regulator to control the output power by adjusting the current. For this part, we can use a voltage switch from the hardware store, the kind that can control the brightness of lights.
Remove the excess decorative parts from the switch and connect it directly to the previously made electrode posts.
The finished product should look like this, and the switch can be easily turned to adjust the current.
Next, we will make the atomizer cover. Use the shorter chip lid to connect a tube and drill holes around it for ventilation.
Finally, we need to make the atomizing core, which should be familiar to e-cigarette enthusiasts. For such a large e-cigarette, we can use a soft spring from the hardware store as the resistance wire. Once done, add an appropriate amount of e-liquid.
 Everything is ready, ready to go, the exciting moment has arrived.
Connect to the power supply to heat the wire. This step must be done very carefully, as it connects to a 220V power supply, which could instantly burn out the resistance wire (spring). Therefore, it is best to conduct this experiment under the guidance of an adult, and wearing safety goggles is strongly recommended. Below is the effect of heating the wire.
The final product, take a gentle puff, and it’s out of this world!
 After reading the above introduction, are the hands-on enthusiasts already eager to try? A friendly reminder, before you start making your own, be sure to take safety precautions, as safety comes first. I believe that if e-cigarette enthusiasts can take this DIY e-cigarette out, it will definitely stand out against other brands.
This DIY tutorial is for players who want to create their own e-cigarette. Friends who often use e-cigarettes know how to DIY an atomizing core. DIY atomizing cores not only cater to personal preferences and better meet usage habits, but they are also more cost-effective compared to pre-made cores. Therefore, making your own atomizing core is a must for all e-cigarette enthusiasts. Today, I am not here to argue; I just want to share knowledge and spread love, discussing how to DIY an entire e-cigarette together.
First, prepare two chip cans:
Then, remove the front lids from the chip cans and apply hot glue to one of the lids.
Next, stick the other lid onto it, and when done, it should look like this:
The glue will dry in a while, and then you can connect the front and back of the chip can.Next, let's make the atomizing platform. Find a suitably sized wooden block, drill holes on both sides with an electric drill, and use hot glue to attach it to the two chip lids.
After connecting the wooden block, drill through the lid to prepare for connecting the electrode posts.
For the electrode posts, you can use large screws and washers available at hardware stores, ensuring to choose materials with good conductivity.
Connect the wires between the washers and tighten the screws on both sides.
The finished product should look like this:
Now our atomizing platform is ready, and next, we need to make the voltage regulator to control the output power by adjusting the current. For this part, we can use a voltage switch from the hardware store, the kind that can control the brightness of lights.Remove the excess decorative parts from the switch and connect it directly to the previously made electrode posts.
The finished product should look like this, and the switch can be easily turned to adjust the current.
Next, we will make the atomizer cover. Use the shorter chip lid to connect a tube and drill holes around it for ventilation.
Finally, we need to make the atomizing core, which should be familiar to e-cigarette enthusiasts. For such a large e-cigarette, we can use a soft spring from the hardware store as the resistance wire. Once done, add an appropriate amount of e-liquid.
Everything is ready, ready to go, the exciting moment has arrived.Connect to the power supply to heat the wire. This step must be done very carefully, as it connects to a 220V power supply, which could instantly burn out the resistance wire (spring). Therefore, it is best to conduct this experiment under the guidance of an adult, and wearing safety goggles is strongly recommended. Below is the effect of heating the wire.
The final product, take a gentle puff, and it’s out of this world!
After reading the above introduction, are the hands-on enthusiasts already eager to try? A friendly reminder, before you start making your own, be sure to take safety precautions, as safety comes first. I believe that if e-cigarette enthusiasts can take this DIY e-cigarette out, it will definitely stand out against other brands.