How to Make Fancy Vape Coils
If you want to chase big clouds and DIY attractive vape coils, many people may feel the process is complicated. Today, we’ll explain how to make fancy vape coils. Specifically, after making or purchasing a specialty coil, how should you heat and prepare i
If you want to play with big clouds and DIY beautiful vape coils, many people might think it's troublesome and difficult. Today, the e-cigarette information website will explain how to make fancy vape coils, specifically how to burn them after making or purchasing a fancy wire.
If you barbarically fire at a super high voltage, it will directly damage the secondary wire of the fancy wire, and in severe cases, it can lead to the complete failure of the heating wire! The reason is very simple: the current that the secondary wire of the fancy wire can withstand is far lower than that of the main wire, and the current flowing in a short circuit state will be very large at certain points. Therefore, we cannot use the methods for burning single wires; that would be too crude.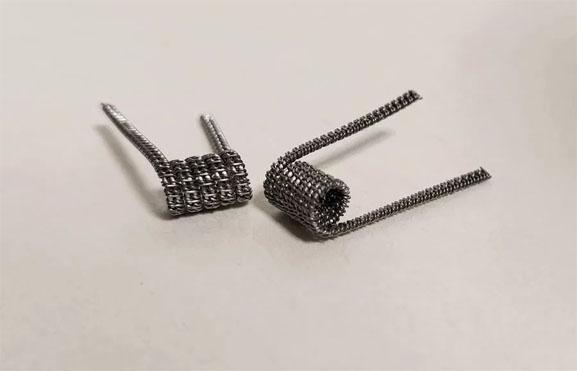 1. Prepare a piece of fancy wire.
2. Clean it thoroughly; using a toothbrush dipped in hand soap or soaking in baking soda is fine.
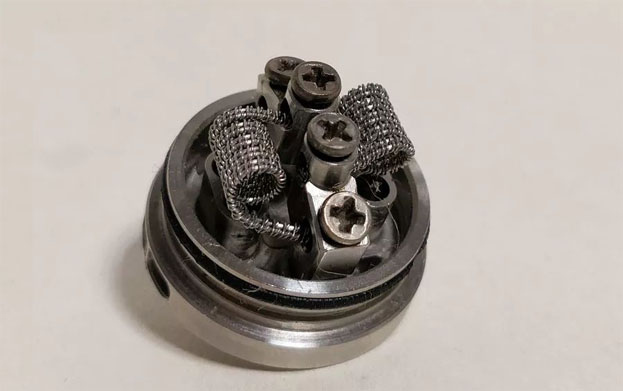
3. Attach the cleaned fancy wire to our atomizer, ensuring that the legs on both sides of the dual fancy wire are of equal length.
1. Prepare a piece of fancy wire.
2. Clean it thoroughly; using a toothbrush dipped in hand soap or soaking in baking soda is fine.
3. Attach the cleaned fancy wire to our atomizer, ensuring that the legs on both sides of the dual fancy wire are of equal length.
 4. Adjust the voltage to around 3.5V. If the device cannot display the voltage, we will use the basic formula: voltage * voltage / resistance = power, which means 3.5 * 3.5 / resistance = power. We know the resistance of our device, and finally, we can adjust using the power. If you have a rod on hand, you can also burn it directly with the rod, but please ensure you are confident and familiar with this process; otherwise, beginners are never advised to use a rod to burn wire.
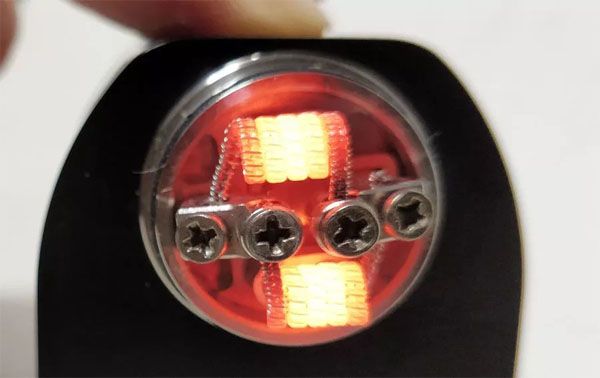
5. Start burning the wire by pressing the fire button for 0.5 to 1 second, using the pulse method. Wait 1 second between pulses, continuously pressing the fire button. At this point, the heating wire may show signs of short-circuiting, with certain small areas glowing brightly. When bright spots appear, remember the approximate location of the bright spots and proceed to the next step.
6. Use "smooth polishing" ceramic tweezers to "gently" scrape the bright spots, causing that small area of the heating wire to vibrate, allowing tightly packed wire materials to separate evenly. At this high temperature, the heating wire will quickly form an oxidized insulating layer on the surface of the loosened wire material. After scraping, try firing again, paying attention to the external appearance of the heating wire and also observing the internal bright spots. The method for handling internal and external bright spots is the same; for internal bright spots, just scrape with the ceramic tweezers.
7. Once the entire heating coil has no bright spots, you can raise the voltage to 3.8V. If both coils heat evenly at this point, the burning process is complete. If one side heats faster and the other slower, continue to the next step; otherwise, you're done.
4. Adjust the voltage to around 3.5V. If the device cannot display the voltage, we will use the basic formula: voltage * voltage / resistance = power, which means 3.5 * 3.5 / resistance = power. We know the resistance of our device, and finally, we can adjust using the power. If you have a rod on hand, you can also burn it directly with the rod, but please ensure you are confident and familiar with this process; otherwise, beginners are never advised to use a rod to burn wire.
5. Start burning the wire by pressing the fire button for 0.5 to 1 second, using the pulse method. Wait 1 second between pulses, continuously pressing the fire button. At this point, the heating wire may show signs of short-circuiting, with certain small areas glowing brightly. When bright spots appear, remember the approximate location of the bright spots and proceed to the next step.
6. Use "smooth polishing" ceramic tweezers to "gently" scrape the bright spots, causing that small area of the heating wire to vibrate, allowing tightly packed wire materials to separate evenly. At this high temperature, the heating wire will quickly form an oxidized insulating layer on the surface of the loosened wire material. After scraping, try firing again, paying attention to the external appearance of the heating wire and also observing the internal bright spots. The method for handling internal and external bright spots is the same; for internal bright spots, just scrape with the ceramic tweezers.
7. Once the entire heating coil has no bright spots, you can raise the voltage to 3.8V. If both coils heat evenly at this point, the burning process is complete. If one side heats faster and the other slower, continue to the next step; otherwise, you're done.
 8. Check the screws that secure the heating wire legs. Most visible uneven heating on both sides is caused by loose screws, which can loosen due to heat. First, ensure the screws securing the two legs of the heating wire are tight. It’s best to wait until the heating wire cools down, then gently wiggle the wire with your fingers before tightening the screws to avoid instability at the wire leg positions. Make sure to tighten the legs to avoid the situation where you think they are tight, but they are not. At this point, fire again; if they still do not heat simultaneously, continue to the next step; otherwise, you're done.
9. Use ceramic tweezers to clamp the slower heating side, tightening the wire material in a circular manner to speed up heat transfer. Alternatively, use ceramic tweezers to pull the faster heating side slightly apart to reduce the heat transfer speed between the coils. Fire again; if they still do not heat simultaneously, continue to the next step; otherwise, you're done.
10. Thoroughly check if the surface of your heating wire's secondary wire is intact. If any small area is burnt black or broken, the heating wire is scrapped. Thoroughly check if the heating wire is touching the electrode post, as contact will create a short circuit in a small section of the heating wire. Thoroughly check if the legs of the heating wire are too long, causing one leg to touch the body of the other side's heating wire, creating a short circuit. Thoroughly check if the number of wraps in the heating wire is consistent; hand-wound wire may have uneven wraps, leading to uneven heating. Thoroughly check if the lengths of the heating wire legs differ too much; uneven lengths will naturally lead to uneven heating. Thoroughly check if the atomizer's electrode post is loose; if it is, wiggle it with your finger and retighten the positive screw at the bottom of the atomizer. After thoroughly checking, fire again; if they still do not heat simultaneously, continue to the next step; otherwise, you're done.
Related Articles on E-cigarette Heating Wires:
Choosing E-cigarette Heating Wires
Cleaning Carbon Build-up on E-cigarette Heating Wires
What is the Difference Between Tight and Loose Winding of E-cigarette Heating Wires?
Comprehensive Summary of the Pros and Cons of E-cigarette Heating Wire Brands
DIY Heating Wire Making Methods
#p#分页标题#e#
8. Check the screws that secure the heating wire legs. Most visible uneven heating on both sides is caused by loose screws, which can loosen due to heat. First, ensure the screws securing the two legs of the heating wire are tight. It’s best to wait until the heating wire cools down, then gently wiggle the wire with your fingers before tightening the screws to avoid instability at the wire leg positions. Make sure to tighten the legs to avoid the situation where you think they are tight, but they are not. At this point, fire again; if they still do not heat simultaneously, continue to the next step; otherwise, you're done.
9. Use ceramic tweezers to clamp the slower heating side, tightening the wire material in a circular manner to speed up heat transfer. Alternatively, use ceramic tweezers to pull the faster heating side slightly apart to reduce the heat transfer speed between the coils. Fire again; if they still do not heat simultaneously, continue to the next step; otherwise, you're done.
10. Thoroughly check if the surface of your heating wire's secondary wire is intact. If any small area is burnt black or broken, the heating wire is scrapped. Thoroughly check if the heating wire is touching the electrode post, as contact will create a short circuit in a small section of the heating wire. Thoroughly check if the legs of the heating wire are too long, causing one leg to touch the body of the other side's heating wire, creating a short circuit. Thoroughly check if the number of wraps in the heating wire is consistent; hand-wound wire may have uneven wraps, leading to uneven heating. Thoroughly check if the lengths of the heating wire legs differ too much; uneven lengths will naturally lead to uneven heating. Thoroughly check if the atomizer's electrode post is loose; if it is, wiggle it with your finger and retighten the positive screw at the bottom of the atomizer. After thoroughly checking, fire again; if they still do not heat simultaneously, continue to the next step; otherwise, you're done.
Related Articles on E-cigarette Heating Wires:
Choosing E-cigarette Heating Wires
Cleaning Carbon Build-up on E-cigarette Heating Wires
What is the Difference Between Tight and Loose Winding of E-cigarette Heating Wires?
Comprehensive Summary of the Pros and Cons of E-cigarette Heating Wire Brands
DIY Heating Wire Making Methods
#p#分页标题#e#